
Our Quarantine Bathroom Makeover
We were lucky that when we bought our house we didn't need to do any major renovations or work. It was perfectly live-able from the moment we moved in. The previous owners had re-done two of the bathrooms, refreshed the kitchen and added some nice touches like the built-in book cases that I'm obsessed with.
But as we settled in, there were a few things we were interested in updating.
The first thing I tackled was the master bathroom. This project wasn't particularly high on our house to-do list, but it wasn't overly complicated, and April's rainy quarantine lockdown meant I had nothing but time on my hands to get started.
Before we get into the fun details of the before and afters, let me start by saying, we live in Washington, D.C. Our master bathroom is tiny. Given the space limitations, my goal was to start with some small things that I hoped would make the space look fresher and more modern and wouldn't require me to bring in outside help during a pandemic. (Though I dream of doing something with the shower in the future).

This is the "after shot." I took this from right in the doorway to try to give you a sense of the size and spatial relation between things that you'll see in other pictures.
The first thing that needed fixing was the floor. A previous owner had stenciled over the original tile. I felt generally meh about the pattern and probably would have let it linger for a while, but by the time we moved in, the paint had started to chip and you could see the tile peeking through. That drove me nuts.

You can see the chipping is really noticeable in the upper right by the shower. Please also note the black baseboards, which I was definitely not a fan of.
So I texted my uncle who's a general contractor and asked for advice. He recommended paint remover and a lot of patience.
And so that's how I found myself spending a large chunk of my April evenings chipping away at paint on the bathroom floor. This was tedious and honestly kind of awful work, and I was very, very glad our bathroom is as tiny as it is.

And here is what the floor and baseboards look like with all the paint removed.

Honestly, I'm not 100% in love with the original tile. I mean I like it better than the chipped paint, but at some point I might consider doing something different with the floor. For now though, I'm just happy to have a nice, neutral floor.
Next up was the vanity. This was the original vanity when we moved in.

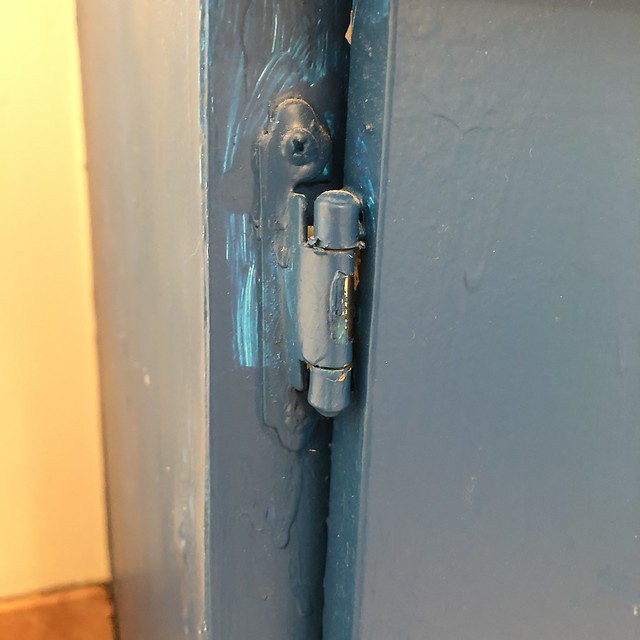
I didn't care for the bright blue or the knobs that weren't level. Also it wasn't the nicest paint job ever, you could still see streaks of white through the blue paint.
Oh, and the hinges had been painted over. If you're gathering from this post that I'm a little bit particular about things, you'd be right. This just looked sloppy.
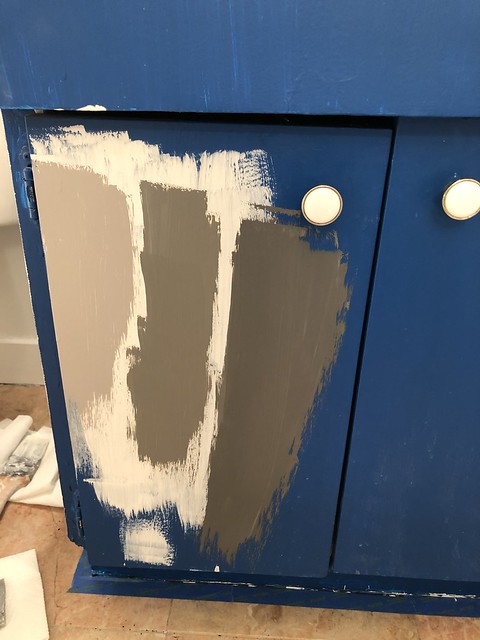
My goal here was to find a nice grey for the vanity and replace the hinges and knobs with something more modern.
The last thing on my list was to create a simple frame for our builder's grade mirror that would match the color of the vanity.

The Internet promised me this would be the easiest DIY task of all. But we ran into a few complications and ended up having to completely take the mirror off the wall, attach the frame and then re-hang the mirror with new dry wall anchors.
It all worked out and the frame looks nice. It was just far more involved than a bunch of DIY blogs led me to believe.

Also, what a difference white baseboards make (see photo below)! For some reason, painting these white just made me feel like they were less of an eye sore, and blended in more seamlessly with the room. The bathroom is small enough as it is, I don't need weird baseboards breaking up the way your eye falls over the room.

So there you have it. New floor and baseboards, updated vanity, new mirror frame. My first home renovation complete!


0 comments